I just posted the my final review of Aperture 2 on www.imageguy.com. While you're there don't forget to sign up for the new RSS feed for the site. This way you can stay up to date on all the new posts
April 13, 2008
April 11, 2008
www.imageguy.com
It official! This blog has been moved to it's own URL!
www.imageguy.com
All the post are there and I will be posting there regularly. The blog is using the standard WordPress theme for now. As soon as I find a "prettier" theme (there are so many to choose from) I will start using it.
Enjoy our new home and I look forward to seeing you there.
Michael Zahora
www.imageguy.com
April 1, 2008
This is not an April fools day joke
That's it... I quit! I'm no longer going to be doing this blog... Just kidding.
Seriously, though. I started this blog to share my ideas, thoughts and experiences, and to have some fun. And I'm doing that. What I wasn't expecting was getting as many visitors as I'm getting. And, even more surprising is the traffic I'm getting from Google™. The search for "Making your own gray card" accounts for almost 65% of all my traffic from Google™ and searching for "beauty dish" on Google™ my post Make Your Own Beauty Dish comes up on the 4th page. The traffic isn't anything close to what David gets at Stobist but it's decent.
My idea was to eventually switch the blog over to my site www.imageguy.com and move the sales page for my gray cards to an internal page. My thinking for doing this so soon, is if I wait too long to switch the blog to imageguy.com I might not be able to regain the Google™ rankings once the posts are moved over. So, my plan is simple. I'm going to install Wordpress on imageguy.com. Make the blog look pretty, move all my old posts over and start blogging on the new site. Simple! Right? We'll see!
If anyone has any experience with Wordpress or has done something like this before PLEEAASE give me any advice or help you can in the comments. I want to do this as quickly as possible, and having no experience with something like this I don't know how long it will take.
March 28, 2008
30 Days Using Aperture 2 (Day 24)
Day 24
Again, I've been busy for last 5 days shooting and working on images. That's a good thing! This time I did a food shoot for the Korean restaurant. Several different dishes but the lighting set up was pretty much the same. This time I played around with the stamp tool. The way Apple approached this is quite clever. Instead of having to save settings in every adjustment you make and then apply each and every saved setting to your image, all you need to do is make all your adjustments on one image and then click on the lift tool (which takes all your settings and opens up s HUD). Now here is the cool part. You can select and apply (stamp) only the setting you want by clicking the the check boxes on and off. You can apply the chosen setting to one image at a time or to as many images as you select. This may not seem like a big deal, but it probably saved me about half an hour of sitting in from in front of the computer. That's an extra half hour I can do something else like shooting or maybe skiing, or mountain biking. I'm off now to figure out what I'm going to do with that extra half hour... I just hope it doesn't take me half an hour to figure out what I'm going to do ;o)
Aperture 2.1 Released
Today Apple announced Aperture 2.1 that allows third party plug-ins. You might never have to leave Aperture at all to do your basic image editing.
Read the press release here.
March 23, 2008
30 Days Using Aperture 2 (Day 19)
Day 19
I've been quite busy over the last 5 days and today I finally had the chance to sit in front of the computer and use Aperture 2.
I was originally confused with the 3 sharpening options available in Aperture 2. The very first one is under the RAW fine tuning heading in the adjustments tab. This one is what Aperture thinks should be applied to all images being converted from RAW files for your particular camera... OK That gets turned off right away! I prefer to make my own decisions regarding my images.
The second one is under the Sharpen heading. This one is a remnant of Aperture 1. Edge sharpening was introduced in Aperture 1.5 and is supposed to be the way to go. Lets see.
I found this article on Apple's website that explains edge sharpening. The image below was converted into B&W and edge sharpening was applied (settings = Intensity - .76, Edges - .31, Falloff - .77). The sharpening was enough for me to actually see, but seems to keep any sharpening artifacts to a minimum.
March 17, 2008
30 Days Using Aperture 2 (Days 13-14)
Days 13-14
Two hours!!!! That's all it took to go through 70+ images and edit them down to 11 final images and crop, adjust and burn a CD (TIFF & JPEG) for the client. Within those two hours I also had a bite to eat, took a phone call and chatted with a friend on MSN. I can honestly say with more practice using Aperture 2 I could easily do all that in under an hour. That's fast!
Yesterday I was preparing for a photo shoot that night for a local restaurant and making a beauty dish to fit on my flash that I could use for that shoot. Today, I imported the images on to my computer's hard drive and then I proceeded to import those images into Aperture 2 (stored on an external hard drive). I started rating the images (1 - 5 stars) by hitting the corresponding numbers on my keyboard while I viewed each image full screen. I would hit the right or left arrow key to move from image to image. I then selected only 3 star or higher images.This gave me my final 11 images (I'm pretty tough on rating my images). The cropping and final adjustments were made on those images and then I exported a TIFF and a JPEG of each image to a CD. Hit burn CD and I was done. Not bad considering my total noobness with Aperture 2.

Sample image
More Aperture 2 post to come.Beauty Dish Update
Yesterday after I made my beauty dish, I got to use it in a promotional shoot I did for a local restaurant. Below is a sample of a small group shot (3 people) sitting at a bar. The beauty dish is about 8 - 10 feet away (2.5 - 3 meters) from the subjects. I'm glad I brought the beauty dish with me. Since it is on about 12 inches (30 cm) in diameter it was much easier to keep it hidden from being seen in the mirror behind the group. This would have been impossible to shoot with a soft-box or an umbrella.
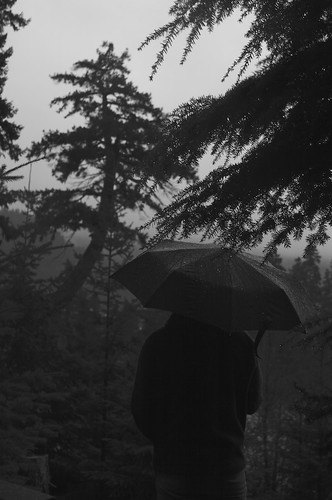
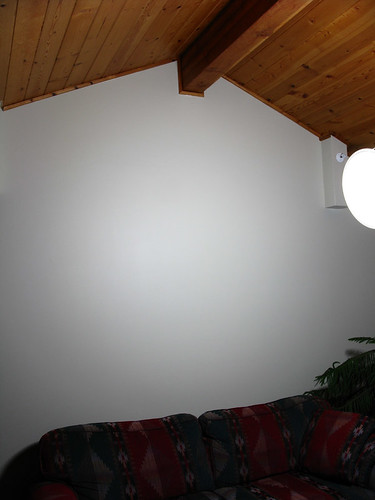
I have included a shot to show the light drop off of the beauty dish. The dish about 6 feet (1.85 meters) away from the wall.
March 16, 2008
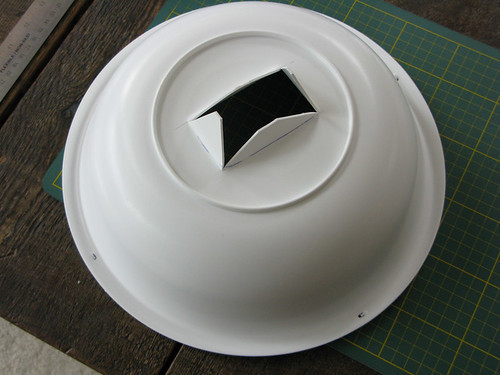
Make Your Own Beauty Dish
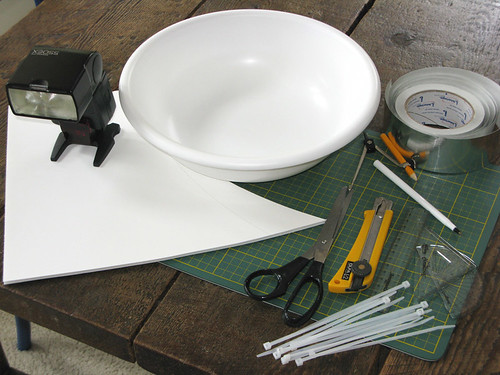
Here is what you need to make a simple beauty dish; white plastic bowl, foam board, zip-ties (zap straps), aluminum tape
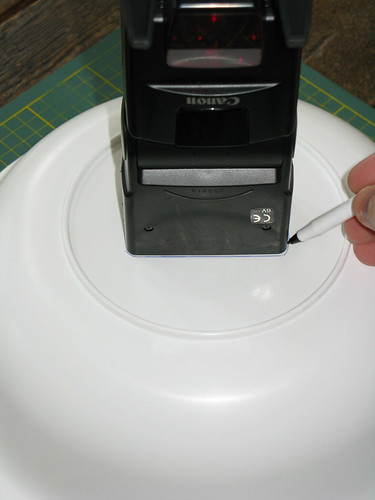
Trace around the front of your flash. Make sure it is centered on the bottom of the bowl.
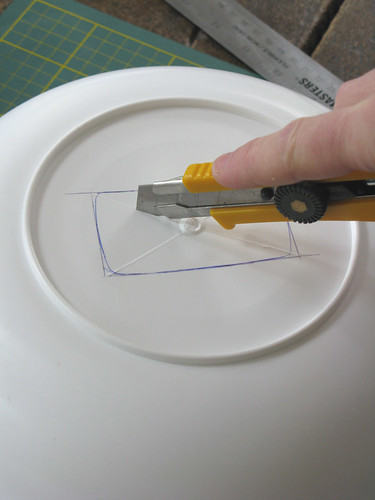
Make 2 diagonal cuts to make the flaps
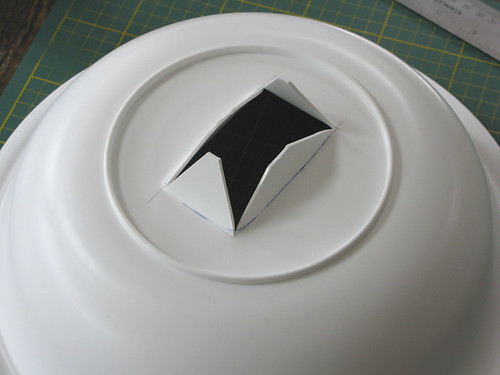
Fold the flaps back 90º.
(Trick - once the flaps are cut, fill your sink with hot water from the tap, let the bottom of the bowl sit in the hot water for about 5 min. to heat up the plastic making it easier to fold back)
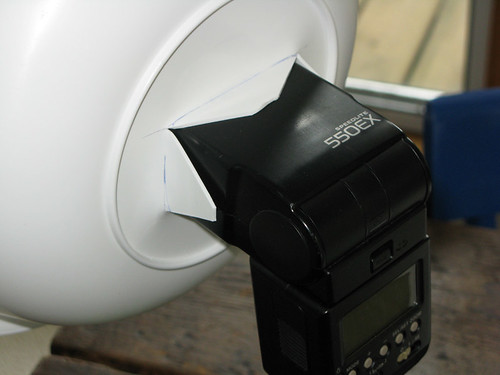
Check to see how your flash fits.
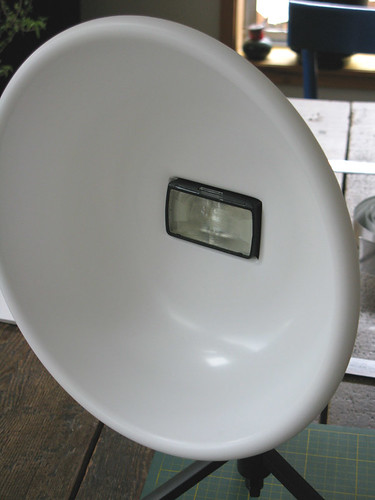
Front view of fit.
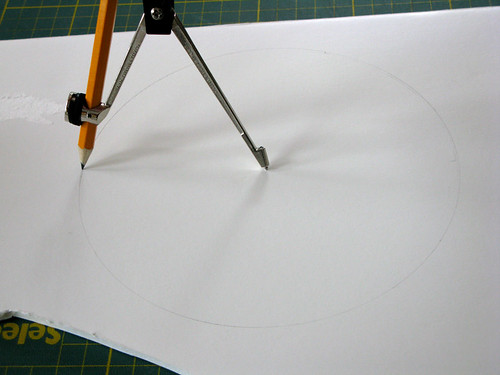
Draw circle on foam board, about 1/2 the diameter of the bowl.

Apply aluminum tape on other side of foam board, making sure the aluminum tape covers a larger area than the circle on the other side.

Cut out circle with sharp box cutter knife.
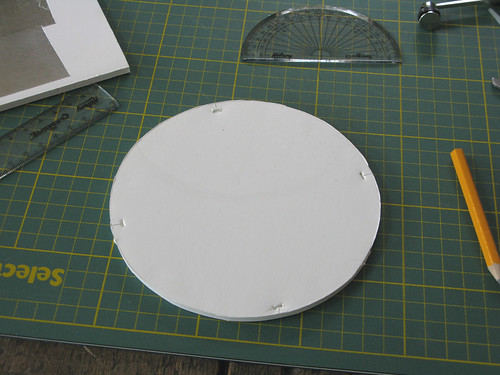
Cut slits just big enough for the zip-ties to fit through every 90º.
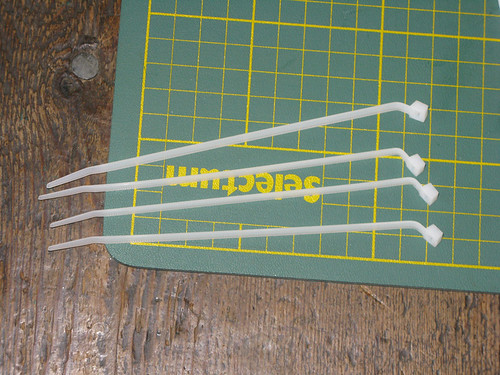
Bend the zip-ties (you'll see why)
Insert zip-ties through the holes you cut into the circle so the bends in the zip-ties face outward (radiating from the circle)

Front view
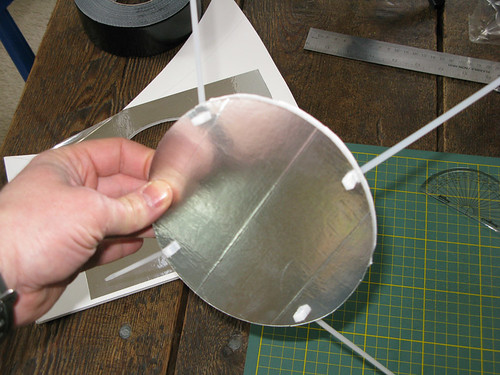
Cut slits into the plastic bowl just big enough for the zip ties to fit through every 90º
(Trick - you might have to insert a small flathead screwdriver into the slits to stretch them just enough to get the zip-ties through, the zip-ties should be held in place by the friction from the slits)
DO NOT MAKE THE SLITS TOO BIG SO THE ZIP-TIES MOVE FREELY!

This is how it looks finished.
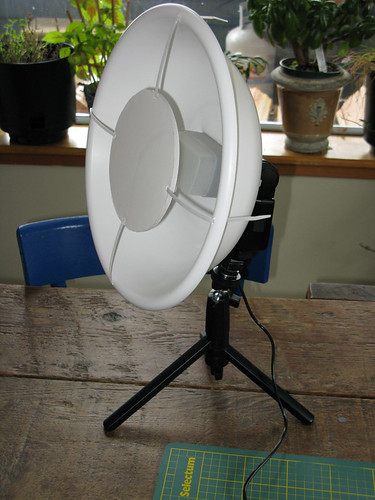
With an omni-bounce on the flash.
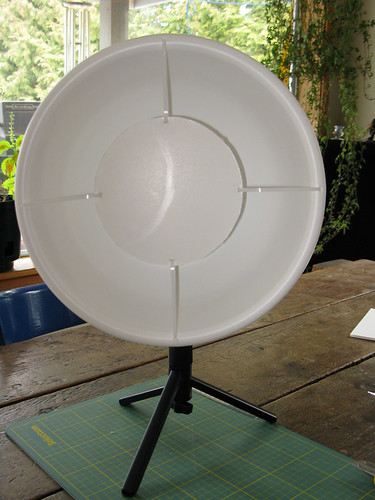
Front view.
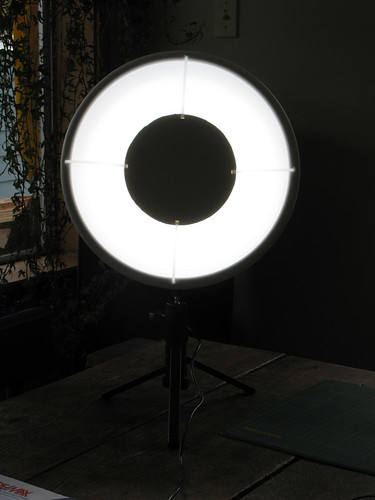
Illuminated (with omni-bounce on flash).

I might not be beautiful, but the light from the beauty dish looks good!
Any questions or comments please post them in the comments.
March 15, 2008
30 Days Using Aperture 2 (Days 10-12)
Days 10-12
I started looking for more detailed information for working with Aperture 2. The tutorials were just not cutting it. It seems when you buy Aperture 2 you get a booklet "Exploring Aperture 2" and sample projects to play with. With the 30 day demo you do not. I did find the the PDF file of "Exploring Aperture 2" here. It is a life saver.
I am now starting to understand the different view modes and the HUD's (Heads Up Displays). My favorite is hitting the "F" key for full screen display and then the "H" key to get the inspector HUD on screen. This gives you just the image you are working on and the inspector HUD that you can move to anywhere on your screen and size it to a good working size. If you move your mouse to the bottom of the screen your browser of your images comes up so you can change the image you are working on. You can also move your mouse to the top of the screen and the toolbar will drop down. By clicking the toggle switch on the right of the toolbar you can set it to stay in place or leave it so it will automatically hide when you move your mouse away from the top of the screen.
I just started using the "Stacks" feature. I like the idea of being able to stack similar images together by selecting the group of images by shift clicking on them and then clicking on Stacks > Stack. You can also Auto Stack images that have been shot in sequence. By clicking Stacks > Auto Stack you will get a HUD that will allow you to select a time interval between images up to 1 min. Once your images are stacked a number will appear on the main image, by clicking on that number you can open and close the stack to view all or just the main image.
More to come soon.
March 12, 2008
30 Days Using Aperture 2 (Day 9)
Day 9
I'm starting to feel like a monkey using Aperture 2. It's probably me, I'm just getting overwhelmed with everything Aperture can do. The learning curve seems quite steep. The tutorials show 2 different screen modes and I can't seem to get to the one I like. I might be too familiar with Adobe products and the Aperture 2 interface is a bit different from what Adobe offers. I think a bit more time using Aperture should get me more comfortable.
Today I watched all the tutorials under the "Compare and Select" heading on Apples website. I'm trying to get to the point where I start "getting" Aperture 2, but I'm not there yet. I'm seriously thinking of joining Aperture Users Professional Network just to understand the program. But, I'm holding off until I decide Aperture 2 is worth the purchase and I decide to commit to it.
In the mean time here is an image I worked on that I took with my Canon G9 while out ski touring behind Whistler Mountain. I'm didn't want to make too many adjustments before I really get to know the software. You can see the adjustments I did make on the left side of the images.
Any input, advice or comments are appreciated.
 Master
 Adjusted
March 11, 2008
30 Days Using Aperture 2 (Days 5-8)
Days 5 & 6
"The Weekend From Heck" I did manage to import 34 reasonably decent images (not my best ones) into Aperture 2. At least I'll be able to show the adjustments and features of Aperture 2.
Day 7
Tried to recover the "lost" images on my computer. No luck! I trying to figure out a solution. Maybe, loading the images on to a PC and converting them to DNG might work. I'll keep you informed.
Day 8
Watched more tutorials (see list below). I'm starting to see the power Aperture 2 has under the hood.
- Cropping and Straightening
- Recovering Highlights
- Setting Levels
- Setting Advanced Levels
- Using the Retouch Brush
March 9, 2008
Weekend from Heck
My internet connection has been a bit slow for the last few days, but that happens. Then, the connection got VERY slow (almost a minute for Google.com to load). WTF? I called tech support for my ISP and they were about as helpful as... well, they weren't any help at all. I didn't have one of their wireless router/modems so they would not help me. A hardwired connection worked fine, but wireless didn't. So, off I went to get a new wireless router. I ended up buying the Apple Airport Extreme base station. Within half an hour (unwrapping and reading the included manual) I was back up and running at faster than previous speed. YIPPIE!
What I really like about the Airport Extreme is I can keep my network secure (not giving out my security settings) and allow client access for a 24 hour period. That's kinda cool.
The other issue I am currently working on is recovering images I shot prior to my switch to Mac. It seems that about 90% of the images I shot in my studio in Toronto that I saved on my PC's hard drive and on CD's are not able to be opened on my Mac (Not the right kind of file). they worked fine on my old PC. I gotta figure out how to save them so my Mac can read them. If you know of a solution please let me know.
I'll be continuing with my "30 Days using Aperture 2" series in a day or so.
March 7, 2008
30 Days Using Aperture 2 (Day 4)
Day 4
After yesterday's post (using a perfectly exposed and white balanced image) I realized I need to import many more images into Aperture 2. And, that's what I'm going to be doing over the next few days. I want to be able to show you all that Aperture 2 can and can't do. But, to do that I need a larger variety of images.
I'm going to go through the thousands of images I've shot over last few years and import ones that need adjustments and use those for future post. OK, I'm going to chain myself to the computer now... see you in a day or so.
March 6, 2008
30 Days Using Aperture 2 (Day 3)
Day 3
The tutorials I watched today on Apple's web site were; "Adjusting White Balance", Adjusting Exposure", and "Enhancing Your Images".
I wanted to show you a more dramatic effect with the adjustments I did today, but my white balance and exposure for the image were dead on (I know, I'm perfect... kidding). It does help tremendously if you use a gray card and a light meter. I think I will have to revisit white balance and exposure adjustments in Aperture 2 with another image, maybe something I took with my Canon G9. I didn't make any adjustments to the white balance and exposure, but I did bump up the saturation to 1.25 and the definition up to .50. The color saturation setting from yesterday's trial adjustments have been removed, but the edge sharpening settings were kept.
The two images below show the "master" image (no adjustments applied) and the adjusted image. I like the feature of being able to toggle between the adjusted image and original "master image" in Aperture 2.
 Unadjusted image "master"
 Adjusted image
March 5, 2008
30 Days Using Aperture 2 (Day 2)
Day 2
Today I watched the following tutorials on Apples website; "Exporting Versions, Masters, and Projects", "Using RAW Fine Tuning", And "Sharpening Images". There is a lot of stuff Aperture 2 can do. I'd like to say I'm starting to scratch the surface, but I'm not even close. I feel like I have my index finger extended and ready to start scratching the surface, but I'm still about a mile away from actually starting to scratch. But I'm getting closer.
Today, I decided to try a quick experiment. "What is the experiment?", you might ask. Let me tell you. I took an image I shot last December, in RAW on my trusty (I said trusty, not rusty) Canon 10D and imported the shot into Aperture 2. I then proceeded to process the image in Aperture, trying to use roughly the same adjustments I used in Canon's Digital Photo Professional. I know it's like comparing strawberries to water buffalo, but I just wanted to see a comparison for myself. This will also be the "before" (before I knew anything about Aperture 2) image, and at the 30 day mark I will process the exact same image as the "after" image using all that I have learned (if I learn anything) and we'll be able to see my progress. For my client I originally increased the saturation in Canon DPP software so the image would "pop" when printed in the local news paper as a small "Grand Opening" ad. I also added some sharpening to the image. I tried to do something similar in Aperture 2. The image on the left is of the contrast settings I used, and the image on the right is the edge sharpening settings I used.
Now for the comparison shots. I'm not going to make any judgments based the two comparison images. I still have way too much to learn regarding Aperture 2 and making any judgment calls this early would be foolish. So lets wait and see what things look like after 30 days, shall we.
 Processed with Canon Digital Photo Professional software
 Processed with Aperture 2
Let me know if you have any questions or comments below.
March 4, 2008
30 Days Using Aperture 2 (Day 1)
I've been wanting to do a post about Aperture 2 for almost a month now since it was announced. The day Aperture 2 was announced I ordered more RAM (Aperture 2 minimum RAM requirement is 1GB) and an external hard drive from an online retailer hoping to get the items in a week or so. Well, I just got the RAM and hard drive yesterday. They were back ordered on the external drive cases. I now have 2GB RAM (recommended) and a 250GB FW400 external drive on iMac G5 2.0 GHz. This is the system and setup I will be using for the next 30 days while using Aperture 2.
My Aperture 2 "test library" resides on the external drive so it doesn't affect my current image library or my system. I installed the software today and the process was quite simple and seamless. I have never used Aperture before so I decided to watch a couple of the tutorials on Apples website - "Exploring the Interface" and "Importing Basics". This was enough to get me familiar enough to create a new project and import 23 images into that project. So far things have been easy, but I'm sure that will change as I explore the software more.
Over the next 30 days I will be posting regularly on my experiences using Aperture 2. Since I am noob at using Aperture you'll be able to learn from my mistakes and probably get a good laugh at the stupid things I end up doing. If there is anything specific you want me to do or try with Aperture just let me know.
February 12, 2008
Aperture 2... Finally!!!
Some photographers gave up on Aperture after months of no updates for any new cameras. People were wondering if Apple dropped the ball and decided to give up on developing Aperture further. Well, it looks like Apple my have redeemed themselves when they announced today the release of Aperture 2 with over 100 new features.
I'll be getting my hands on a copy shortly and I'll give you all an update after I have had time to play with it for a while.
January 29, 2008
DPReview Launches Lens Reviews
Pre-PMA 2008: Dpreview is pleased to announce the launch of a new section dedicated to testing and reviewing digital SLR lenses. Designed to offer the same class-leading testing standards as its legendary camera reviews, dpreview’s new lens reviews are the result of months of intense research, development and testing, including the development of new test charts and proprietary analysis software designed to overcome the limitations of existing systems.
You can read more about it here.
January 27, 2008
Softlight for your Speedlight
Yesterday evening turned into arts and crafts night. I was starting to go stir crazy from being stuck at home with this cold so I had to do something. The following is the result:
I remember in college (long, long time ago) we had these great Mole-Richardson Softlights in one of the studios. And the light they produced was quite nice. So, I thought, lets see if I can make one for my 550EX.
Here are a couple images of the finished softlight.


- Ruler
- White fome board
- White bristol board
- Aluminum tape
- Scissors
- Pencil
- X-acto blade/knife
- Glue stick
 The first thing i did was cut out the sides from the foam board.
 I measured the height of the front edge.
 I then transferred that measurement to the bristol board (already cut to the width I wanted, including 1.5" extra for gluing tabs) and folded the board at that measurement.
 I marked on the bristol board where the next fold would be and then folded the board.
 I then marked where the 3rd fold would be and folded the board.
 I marked the board 1/2" from the edge on both sides with a pencil.
 I then cut out gluing tabs up to the lines I just drew at all the folds and cut smaller notches for the curved back.
 I then applied aluminum tape up to the 3rd fold. Leaving the curved back white.
 I applied aluminum tape to the foam board sides to the bottom portion (from where the from panel starts to where the curve begins).
 I then fold up all the gluing tabs along the 1/2" pencil marks, using a ruler as a guide.
 Then I mark the back where the flash will fit (between the first and second fold) and draw diagonal lines from corner to corner of the flash outline. Then cut along those diagonal lines creating an "X" where the flash fits through.
I then glued the bristol board to one of the foam board sides applying glue to the tabs with a glue stick. Then repeated the gluing process with the other side making sure the aluminum tape faces inside of the softlight.
 Here is what the inside of the softlight looks like when complete.
Disclaimer: This project, the photography and the blog post were all done while running a fever and on cold medication. If there is anything that is unclear (like I was during this whole process) please ask any questions in the comments. I will be posting sample images using the softlight as soon as possible.
Back at it
It's been a busy week and on top of that I'm fighting off a nasty cold. I've either been out of the house, or sleeping. Yesterday (Saturday), I finally got to stay home and rest. I took mom's advice and drank plenty of liquids and ate lots of soup.
I'm feeling better (I can now sit in front of the computer without things getting fuzzy), but still not 100%. Hopefully, things will get back to normal soon. I'm working on a few projects and should be posting things up on the blog shortly.
January 20, 2008
Adobe Lightroom® What's next and what do we want.
If you haven't seen or tried Adobe Lightroom® you owe it to yourself to check it out. It might just change your RAW workflow forever and you might wonder how you ever lived without it. They have a free 30 day trial available so you can see if you like it (and you probably will) before you lay down you hard earned cash.
There is a great article by Stephen Shankland on what features might be added to Lightroom® in the future.
Scott Kelby at Photo Insider has put together a wish-list of feature he, and many others would like to see added to Lightroom®. If you are not familiar with Scott Kelby then check out his site, www.scottkelby.com.
January 16, 2008
Dead Batteries!?!?
- 1 Digital SLR
- 1 Film SLR
- 1 Digital Point n' Shoot
- 3 On Camera Flashes
- 1 Light/Flash Meter
- 1 Visible Dust Sensor Cleaner
What do all these things have in common? They all live in my camera bag and they all need batteries. That list does not include my car battery, the battery in the UPS my computer is hooked up to, a couple of laptop batteries, my cell phone battery, the battery in my watch, or the battery in my iPod. All those batteries are in the devices I use for my photography business. If you have lost track... that's 14 devices that use batteries and some of those devices use multiple batteries, and I have several sets of batteries ready as back-ups. That's a lot of batteries! And there are even more things that use batteries in my everyday life.
I now have a couple of batteries, from different devices, that have given up the ghost. Luckily, I have an easy solution for sending my dead batteries for recycling here in Whistler, BC. But not everywhere is as environmentally conscious. I don't want to sound "preachy" (if that's even a word) but batteries need to be recycled, and as photographers we need to do our part.
So after a little bit of research I found this link to where you can recycle your batteries. And while you're there check out the rest of the site www.earth911.org.
If you know of a location to recycle batteries in your area, please post the information in the comments. Thanks.
January 15, 2008
New Stuff from Apple
Today Apple® announced a few new products. Two of which might be of interest to photographers. Time Capsule a wireless router and hard drive combination, and a new light and thin notebook the MacBook Air.
January 13, 2008
Painting With Light
 In the image above I have the model light herself with the flashlight
I was originally thinking of posting a how to on the basics of painting with light, but then I thought, "How boring!" I couldn't bear the thought of subjecting you to images of things being drawn in mid air, or people being outlined with flashlights. I did a model test shoot years ago in my studio in Toronto using only a small flashlight to light the model. These are some of the images form that shoot.
The setup I used was simple, a black bench, my camera on a tripod set at f16 & bulb with a cable release attached, and the model. Oh yah, and my trusty little flashlight. I tried to keep the exposure time under 30 seconds to keep sensor noise to minimum. Grab your camera, tripod, a flashlight, and a cable release and find a dark room or go outside at night and give it a try. It's not as hard as it looks. And have fun!
 This image looks blurry, but look closely at the reflection of the flashlight in her eyes and eye lashes... It's tack sharp!
 I intentionally asked the model to keep looking at the camera while she moved her head
I you have any questions or comments feel free to post them below. And post some links to your images too.
Subscribe to:
Posts (Atom)


